Hacking the Technicolor TG799vac (and unlocking features!)
NOTE: This guide is probably not going to be updated and it will remain here as an archive.
Current / new updates were originally published on the Whirlpool Wiki, but are now published at
https://hack-technicolor.readthedocs.io/en/stable/
Archived content follows:
- The basics
- Really advanced topics !
- Changing max sync speeds
- Using bridge mode with a dedicated PPPoE ethernet port
- Enable web interface features in Bridge Mode
- Configuring multiple third party SIP providers
- SIP call routing
- Registering DECT handsets
- LAN SIP client use of the mini-PABX in the modem
- Serial Console
- NAT ALG helpers
- tcpdump is now in the diagnostics?
- Handy info for checking what's running in your modem
- What's that System Extras tab and what can I do in there?
- My firmware is so old that AutoFlashGUI can't authenticate to the modem!
- I want to factory reset 17.2 but I don't want to have to re-flash (aka Ghetto Reset!)
- I'm selling this modem, how do I securely wipe all the config?
The basics
The TG799vac, known more commonly in Australia as the “Telstra Gateway Max” is a very capable piece of equipment. It has 802.11ac, a VDSL / ADSL2 modem (meaning NBN FTTN compatibility), a DECT base station, 2 x FXS ports for analogue ports, and an FXO port, is known for getting high sync speeds for VDSL2, has a high quality internal PCB and power supply and it’s power consumption is quite good at 12 watts with WiFi on (typical router config) and 9 watts with WiFi off (typical bridge mode config). The newer verstions of this device are the TG800 “Telstra Gateway Max 2” and DJN2103 “Telstra Gateway Frontier”, which most of the following will also apply to, if the device has a firmware version low enough, or which it can still be downgraded to.
They are provided directly to Telstra – and as such, has Telstra branded firmware. There is no ‘generic’ firmware available that will just give you access to the modem as any other device you would purchase. Personally, I think this kind of sucks – as if you decide to use this device with anyone other than Telstra, you lose access to the VoIP functionality, DECT base station, FXO ports. That was the motivation to get into this device and re-enable as many features as possible.
By default, the IP address of the modem will be 10.0.0.138.
This guide is the “new version” which uses the flashing tool developed by Mark Smith as well as the input from the Whirlpool community to enable as many features as possible.
To use this guide you must be on firmware 17.2.0188-820-RA or lower (there are reports that the 17.2.0188-820-RB variant has the web flashing functionality disabled) or be able to downgrade to it.
What you will need to proceed:
- The AutoFlashGUI tool. This is compiled for windows but if you have Python 3 installed see the instructions at the top of the source\autoflashgui.py for installing missing modules so you can run this on any OS (the latest version will ask to install missing modules but if it fails you may have to install them manually). Make sure you can run this tool and load the GUI up before you go offline!
- The v16.3 firmware rbi for your modem.
- The v17.2.0188-820-RA rbi file for your modem (If you flash to anything newer you may lock yourself out of the modem permanently).
- A SSH client. The famous Putty SSH client is recommended on Windows.
- A copy of this web page for reference while you're offline.
- Physical access to the modem so you can power cycle it and unplug the WAN/DSL while you're going through this process.
- A 'happy' modem! If it's in bridge mode or half the tiles are missing on the screen (which seems to be caused by corrupted config), factory reset it first.
The basic steps to getting root access to firmware v17.2 on your modem
These instructions refer to the TG799, so if you are doing this for a different modem be sure to use the correct file names for the firmare.
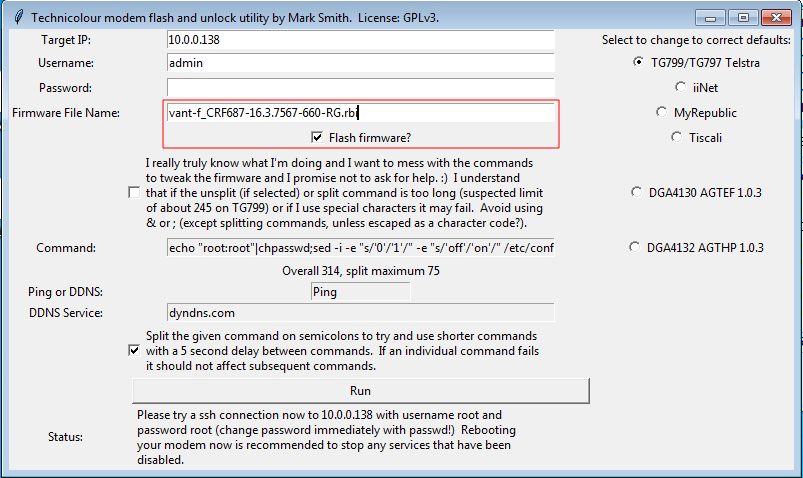
Run up the AutoFlashGUI tool and flash vant-f_CRF683-17.2.188-820-RA.rbi to your modem. flashgui_17.2.png)
This will take about 3-4 minutes. The flasher will try and root your modem but it will fail (silently) - this is expected. If the flash fails to push the firmware in, try again (is the username and password correct?), and if it still fails with some permission error in the console, you may have been locked out of flashing via the web interface: bad luck. Maybe a PXE firmware load can help but you require good luck at this point. Ask for help in the whirlpool thread! (Note that firmware before v15.x may require some manual work, see ‘My firmware is so old that AutoFlashGUI can’t authenticate to the modem!’ )
Now use AutoFlashGUI to flash in vant-f_CRF687-16.3.7567-660-RG.rbi and allow it to run through including getting root.
At this point we are ready to do the procedure to activate root on 17.2 and switch over to it. This procedure works by allowing us to mod the inactive (but newer) image’s file system and config, then switch back to it without doing a factory reset or official upgrade. Note that if you factory reset while on 17.2 you will need to run the entire procedure from where you flashed v16.3 to get root back, and it could upgrade and lock you out permanently in that reset state if it has internet access!
Fire up your SSH client and connect to the modem on port 22.
Have a look at your current modem state. It should look something like this:
1
2
3
4
5
6
7
8
9
10
11
12
13
14
15
16
17
# find /proc/banktable -type f -print -exec cat {} ';'
/proc/banktable/notbootedoid
59b21e26bc549719f7f1bedd
/proc/banktable/bootedoid
5940db6a20338215a4c97c89
/proc/banktable/passiveversion
17.2.0188-7021004-20170908063550-00f42f11f9c253e3f1001b1558043e970a3d9b5d
/proc/banktable/activeversion
16.3.7567-2521030-20170614084458-887a8c777ed8527277d7137ed9149816c889cf1d
/proc/banktable/inactive
bank_2
/proc/banktable/active
bank_1
/proc/banktable/notbooted
bank_2
/proc/banktable/booted
bank_1
These modems use two flash partitions (bank_1 and bank_2) which can be upgraded/used almost independently. They are digital-signature verified before boot so you can’t edit the rom image in the flash. The config is stored in the matching folder in /overlay i.e. /overlay/bank_2 (hint: you can see your modified config files in here if you want to back stuff up or see what changes you made). When a proper factory reset is done, the overlay partition is formatted (but not securely wiped - see section later).
Run the following to set 17.2 up for temporary root and switch back to it:
1
2
3
4
5
6
7
8
9
10
11
# rm -rf /overlay/`cat /proc/banktable/inactive`
# mkdir /overlay/`cat /proc/banktable/inactive`
# chmod 755 /overlay/`cat /proc/banktable/inactive`
# mkdir /overlay/`cat /proc/banktable/inactive`/etc
# chmod 775 /overlay/`cat /proc/banktable/inactive`/etc
# echo "echo root:root | chpasswd" > /overlay/`cat /proc/banktable/inactive`/etc/rc.local
# echo "dropbear -p 6666 &" >> /overlay/`cat /proc/banktable/inactive`/etc/rc.local
# chmod +x /overlay/`cat /proc/banktable/inactive`/etc/rc.local
# echo `cat /proc/banktable/inactive` > /proc/banktable/active
# sync
# cat /overlay/`cat /proc/banktable/active`/etc/rc.local
Now check it all looks right - you should get this output from the last command:
1
2
echo root:root | chpasswd
dropbear -p 6666 &
Reboot and wait 3 to 4 minutes for the modem to boot into 17.2.
Setting up firmware v17.2
Log in to the modem with SSH on port 6666 using root/root. At this point you have temporary root on 17.2, but it’s not how we should leave things.
Run the following in SSH to turn on more functionality and clean up. Note that you can only paste so much into the terminal in one go, so if you get weird errors just cut the block back a bit and try again:
1
2
3
4
5
6
7
8
9
10
11
12
13
14
15
16
17
18
19
20
21
22
23
24
25
26
27
28
29
30
31
32
33
34
35
36
37
38
39
40
41
42
43
44
45
46
47
48
49
50
51
52
53
54
55
56
57
58
59
60
61
62
63
64
65
66
67
68
69
70
71
72
73
74
75
76
77
78
# Block 1
uci set dropbear.lan.enable='1'
uci set dropbear.lan.PasswordAuth=on
uci set dropbear.lan.RootPasswordAuth=on
uci add_list web.tvoicesipconfig.roles=admin
uci add_list web.tvoicecontacts.roles=admin
uci add_list web.tvoicecalllog.roles=admin
uci add_list web.tvoicecapability.roles=admin
uci add_list web.parentalblock.roles=admin
uci add_list web.ruleset_main.rules=mmpbxinoutgoingmapmodal
uci set web.mmpbxinoutgoingmapmodal=rule
uci set web.mmpbxinoutgoingmapmodal.target='/modals/mmpbx-inoutgoingmap-modal.lp'
uci add_list web.mmpbxinoutgoingmapmodal.roles='admin'
uci add_list web.ruleset_main.rules=mmpbxstatisticsmodal
uci set web.mmpbxstatisticsmodal=rule
uci set web.mmpbxstatisticsmodal.target='/modals/mmpbx-statistics-modal.lp'
uci add_list web.mmpbxstatisticsmodal.roles='admin'
uci set cwmpd.cwmpd_config.state=0
uci set cwmpd.cwmpd_config.upgradesmanaged=0
uci set cwmpd.cwmpd_config.periodicinform_enable=0
uci set cwmpd.cwmpd_config.acs_pass='0'
uci set cwmpd.cwmpd_config.acs_user='0'
uci set cwmpd.cwmpd_config.acs_url='invalid'
uci set wifi_doctor_agent.config.enabled=0
uci add_list web.ruleset_main.rules=cwmpconfmodal
uci set web.cwmpconfmodal=rule
uci set web.cwmpconfmodal.target='/modals/cwmpconf-modal.lp'
uci add_list web.cwmpconfmodal.roles='admin'
uci set hotspotd.main.ipv4=0
uci set hotspotd.main.enable=false
uci set hotspotd.main.deploy=false
uci set hotspotd.TLS2G.enable=0
uci set hotspotd.FON2G.enable=0
uci add_list web.ruleset_main.rules=iproutesmodal
uci set web.iproutesmodal=rule
uci set web.iproutesmodal.target='/modals/iproutes-modal.lp'
uci add_list web.iproutesmodal.roles='admin'
uci add_list web.ruleset_main.rules=systemmodal
uci set web.systemmodal=rule
uci set web.systemmodal.target='/modals/system-modal.lp'
uci add_list web.systemmodal.roles='admin'
uci add_list web.ruleset_main.rules=relaymodal
uci set web.relaymodal=rule
uci set web.relaymodal.target='/modals/relay-modal.lp'
uci add_list web.relaymodal.roles='admin'
uci add_list web.ruleset_main.rules=natalghelpermodal
uci set web.natalghelpermodal=rule
uci set web.natalghelpermodal.target='/modals/nat-alg-helper-modal.lp'
uci add_list web.natalghelpermodal.roles='admin'
uci set tls-vsparc.Config.Enabled='0'
uci set tls-vsparc.Passive.PassiveEnabled='0'

# Block 2
uci add_list web.ruleset_main.rules=diagnosticstcpdumpmodal
uci set web.diagnosticstcpdumpmodal=rule
uci set web.diagnosticstcpdumpmodal.target='/modals/diagnostics-tcpdump-modal.lp'
uci add_list web.diagnosticstcpdumpmodal.roles='admin'
uci set system.config.export_plaintext='1'
uci set system.config.export_unsigned='1'
uci set system.config.import_plaintext='1'
uci set system.config.import_unsigned='1'
uci commit
sed -e 's/session:hasAccess("\/modals\/diagnostics-network-modal.lp")/session:hasAccess("\/modals\/diagnostics-network-modal.lp") and \n session:hasAccess("\/modals\/diagnostics-tcpdump-modal.lp")/' -i /www/cards/009_diagnostics.lp
sed -e 's^alt="network"></div></td></tr>\\^alt="network"></div></td>\\\n <td><div data-toggle="modal" data-remote="modals/diagnostics-tcpdump-modal.lp" data-id="diagnostics-tcpdump-modal"><img href="#" rel="tooltip" data-original-title="TCPDUMP" src="/img/network_sans-32.png" alt="network"></div></td></tr>\\^' -i /www/cards/009_diagnostics.lp
sed -e 's/{"logviewer-modal.lp", T"Log viewer"},/{"logviewer-modal.lp", T"Log viewer"},\n {"diagnostics-tcpdump-modal.lp", T"tcpdump"},\n/' -i /www/snippets/tabs-diagnostics.lp
sed -e 's/getrole()=="guest"/getrole()=="admin"/' -i /www/snippets/tabs-voice.lp
sed -e 's/{"mmpbx-sipdevice-modal.lp", T"Sip Device"},/{"mmpbx-sipdevice-modal.lp", T"Sip Device"},\n{"mmpbx-inoutgoingmap-modal.lp", T"In-Out Mapping"},\n{"mmpbx-statistics-modal.lp", T"Statistics"},/' -i /www/snippets/tabs-voice.lp
sed -e 's/if currentuserrole == "guest" /if currentuserrole == "admin" /' -i /www/docroot/modals/gateway-modal.lp
echo > /etc/rc.local
/etc/init.d/nginx restart;
/etc/init.d/cwmpd disable;
/etc/init.d/cwmpdboot disable;
/etc/init.d/wifi-doctor-agent disable;
/etc/init.d/hotspotd disable;
/etc/init.d/tls-vsparc disable;
killall -9 hotspotd cwmpd cwmpdboot watchdog-tch wifi-doctor-agent tls-vsparc;
/etc/init.d/dropbear start
echo > /etc/dropbear/authorized_keys
Now change the root password:
passwd
Reboot now if you’re not doing any futher configuration.
At this point you should now be able to SSH in on 17.2 with root and your password (which should no longer be root at this point!)
VOIP Setup
If you want to use VOIP, the following is the quickest way to set it up and remove some broken config that causes calls to be sent out via the FXO port which will be unplugged for everyone in Australia once you are on NBN unless you are in a fixed wireless area where the voice services are still being delivered over the copper lines. We also reset the LAN SIP inbound passwords here for security (see ‘LAN SIP client use of the mini-PABX in the modem’ to use them if you wish to but nothing else has to be done). Please don’t post the default passwords in public forums as they could be a security risk for those still using them!
1
2
3
4
5
6
7
8
9
10
11
12
13
14
15
16
17
18
19
20
21
22
23
24
25
26
27
28
29
30
31
32
33
34
35
36
37
38
39
40
41
42
43
44
45
46
47
48
49
50
51
52
53
54
55
56
57
58
59
60
61
#Block 1
uci set mmpbxrvsipnet.sip_net.primary_proxy='sipserver'
uci set mmpbxrvsipnet.sip_net.primary_registrar='sipserver'
uci set mmpbxrvsipnet.sip_profile_0.uri='SIPuserName'
uci set mmpbxrvsipnet.sip_profile_0.user_name='SIPuserName'
uci set mmpbxrvsipnet.sip_profile_0.password='SIPpassword'
uci set mmpbxrvsipnet.sip_net.primary_proxy_port='5060'
uci set mmpbxrvsipnet.sip_net.primary_registrar_port='5060'
uci set mmpbxrvsipnet.sip_profile_0.enabled='1'
uci set mmpbxbrcmfxsdev.fxs_dev_0.relay_state='1'
uci set mmpbxbrcmfxsdev.fxs_dev_1.relay_state='1'
uci del_list mmpbx.@outgoing_map[0].profile='fxo_profile'
uci del_list mmpbx.@outgoing_map[0].priority='2'
uci del_list mmpbx.@outgoing_map[1].profile='fxo_profile'
uci del_list mmpbx.@outgoing_map[1].priority='2'
uci del_list mmpbx.@outgoing_map[2].profile='fxo_profile'
uci del_list mmpbx.@outgoing_map[2].priority='2'
uci del_list mmpbx.@outgoing_map[3].profile='fxo_profile'
uci del_list mmpbx.@outgoing_map[3].priority='2'
uci del_list mmpbx.@outgoing_map[4].profile='fxo_profile'
uci del_list mmpbx.@outgoing_map[4].priority='2'
uci del_list mmpbx.@outgoing_map[5].profile='fxo_profile'
uci del_list mmpbx.@outgoing_map[5].priority='2'
uci del_list mmpbx.@outgoing_map[6].profile='fxo_profile'
uci del_list mmpbx.@outgoing_map[6].priority='2'
uci del_list mmpbx.@outgoing_map[7].profile='fxo_profile'
uci del_list mmpbx.@outgoing_map[7].priority='2'
uci del_list mmpbx.@outgoing_map[8].profile='fxo_profile'
uci del_list mmpbx.@outgoing_map[8].priority='2'
uci del_list mmpbx.@outgoing_map[9].profile='fxo_profile'
uci del_list mmpbx.@outgoing_map[9].priority='2'
uci del_list mmpbx.@outgoing_map[10].profile='fxo_profile'
uci del_list mmpbx.@outgoing_map[10].priority='2'
uci del_list mmpbx.@outgoing_map[11].profile='fxo_profile'
uci del_list mmpbx.@outgoing_map[11].priority='2'
uci del_list mmpbx.@outgoing_map[12].profile='fxo_profile'
uci del_list mmpbx.@outgoing_map[12].priority='2'
uci del_list mmpbx.@outgoing_map[13].profile='fxo_profile'
uci del_list mmpbx.@outgoing_map[13].priority='2'
uci del_list mmpbx.@outgoing_map[14].profile='fxo_profile'
uci del_list mmpbx.@outgoing_map[14].priority='2'

#Block 2
uci set mmpbxrvsipdev.sip_dev_0.password=`dd if=/dev/urandom bs=1 | tr -dc A-Za-z0-9 | head -c${1:-10}`
uci set mmpbxrvsipdev.sip_dev_1.password=`dd if=/dev/urandom bs=1 | tr -dc A-Za-z0-9 | head -c${1:-10}`
uci set mmpbxrvsipdev.sip_dev_2.password=`dd if=/dev/urandom bs=1 | tr -dc A-Za-z0-9 | head -c${1:-10}`
uci set mmpbxrvsipdev.sip_dev_3.password=`dd if=/dev/urandom bs=1 | tr -dc A-Za-z0-9 | head -c${1:-10}`
uci set mmpbxrvsipdev.sip_dev_4.password=`dd if=/dev/urandom bs=1 | tr -dc A-Za-z0-9 | head -c${1:-10}`
uci set mmpbxrvsipdev.sip_dev_5.password=`dd if=/dev/urandom bs=1 | tr -dc A-Za-z0-9 | head -c${1:-10}`
uci set mmpbxrvsipdev.sip_dev_6.password=`dd if=/dev/urandom bs=1 | tr -dc A-Za-z0-9 | head -c${1:-10}`
uci set mmpbxrvsipdev.sip_dev_0.push_type='none'
uci set mmpbxrvsipdev.sip_dev_1.push_type='none'
uci set mmpbxrvsipdev.sip_dev_2.push_type='none'
uci set mmpbxrvsipdev.sip_dev_3.push_type='none'
uci set mmpbxrvsipdev.sip_dev_4.push_type='none'
uci set mmpbxrvsipdev.sip_dev_5.push_type='none'
uci set mmpbxrvsipdev.sip_dev_6.push_type='none'
uci delete mmpbxrvsipdev.sip_server.apn_cert_key
uci delete mmpbxrvsipdev.sip_server.apn_interface
uci commit
/etc/init.d/mmpbxd restart
Speeding up VDSL sync times
If you’re on VDSL you may be able to speed up your sync times by removing redundant DSL profiles so the modem does not even try to use them. Don’t do this if you’re still on ADSL!
1
2
3
4
5
6
7
8
9
10
11
uci del_list xdsl.dsl0.profile='8a'
uci del_list xdsl.dsl0.profile='8b'
uci del_list xdsl.dsl0.profile='8c'
uci del_list xdsl.dsl0.profile='8d'
uci del_list xdsl.dsl0.profile='12a'
uci del_list xdsl.dsl0.profile='12b'
uci del_list xdsl.dsl0.multimode='gdmt'
uci del_list xdsl.dsl0.multimode='adsl2annexm'
uci del_list xdsl.dsl0.multimode='adsl2plus'
uci commit
reboot
If you wish to add the selections to the web interface to play with later, you can run the following:
1
2
3
4
5
uci add_list web.ruleset_main.rules=xdsllowmodal
uci set web.xdsllowmodal=rule
uci set web.xdsllowmodal.target='/modals/xdsl-low-modal.lp'
uci add_list web.xdsllowmodal.roles='admin'
uci commit
Running the TG799 as the router with a second router behind it (double nat)
Double NAT used to break many things, but testing with this configuration shows that most current applications are very tollerant of it. Most applications assume they are on a private network and that their visible IP is not the one they are visible on on the internet via, so if it’s nested one more level down via NAT with a DMZ redirecting traffic to the second router’s WAN interface it makes very little difference (if this guide is followed)!
There are many reasons you would want to do this:
- You have a complex network setup with a more advanced router running services such as a VPN server and you still want to use the VOIP in the TG799 so that it can manage the packet priority tagging properly.
- You don't quite trust the TG799
- You want a simpler solution than the "Using bridge mode with a dedicated PPPoE ethernet port" section below outlines which can be a nightmare to set up and debug if something goes wrong.
- You want easy access to the TG799 GUI so you can get sync speeds etc at the modem's IP. This is still possible in bridged mode but it's less stright forward.
Here is how you go setting this up properly:
- Set up the TG799 as above fully including VOIP etc and make sure it works to your satisfaction.
- The TG799's default LAN IP on Telstra firmware is 10.0.0.138 and subnet mask 255.255.255.0. If your inner router also has a default LAN subnet of 10.0.0.0 then it's advised to change one of them (probably the TG799 so your network will not be disrupted) to a subnet of your choosing such as 10.0.100.0 subnet mask 255.255.255.0. The rest of this section assumes you moved the TG799's LAN IP to 10.0.100.1 subnet mask 255.255.255.0.
- Add a "static lease" on the TG799 under Advanced -> Local Network -> Static Leases with your internal router's WAN MAC address and a suitable ip such as 10.0.100.2.
- Connect your inner router's WAN port to one of the TG799's LAN ports.
- Confirm on the inner router that it got 10.0.100.2 as the WAN IP. If it did not, reboot both of them at the same time to get rid of any lingering DHCP leases. If that fails re-check the MAC address of the lease handed out from the TG799.
- On the TG799 under Advanced -> WAN Services -> DMZ enable it and set the IP to 10.0.100.2 . Set up DynDNS if you want to. Save.
- Turn off WiFi on the TG799.
At this point the TG799 should be transparent to incoming requests which will hit the WAN interface of your internal router and be handled normally.
Really advanced topics !
Changing max sync speeds
You can change the max values for sync speeds. The value maxusdatarate controls the upstream maximum sync speed, maxdsdatarate controls the downstream maximum sync speed, and maxaggrdatarate is the maximum combined speed. The defaults are listed below. This doesn’t change any limitations imposed by line length – or at the DSLAM. If you won the node lotto and are feeling lucky you can modify these like so:
1
2
3
4
5
uci set xdsl.dsl0.maxaggrdatarate='160000'
uci set xdsl.dsl0.maxdsdatarate='110000'
uci set xdsl.dsl0.maxusdatarate='40000'
uci commit xdsl
reboot
Using bridge mode with a dedicated PPPoE ethernet port
I use the AP on the device on my LAN, but I also use the modem purely in bridge mode, which means I want to dedicate a port to my router to allow it to do PPPoE to my ISP. It should also work with IPoE. Thankfully, standard OpenWRT config applies. I added a new bridge called ‘adsl_wan’ and added eth4, eth3, atm_8_35 and ptm0 to it:
1
2
3
4
5
6
7
8
config interface 'adsl_wan'
 option type 'bridge'
 option ip6hint '0'
 option force_link '0'
 list ifname 'eth4'
 list ifname 'eth3'
 list ifname 'atm_8_35'
 list ifname 'ptm0'
You’ll need to remove eth3 from the LAN vlan. This gives you the port right next to the WAN ethernet (which is eth3 – eth4 is the WAN port) on the same bridge as the VDSL/ADSL modem. I have yet to figure out how to get the WAN port to do this – as it seems to be configured differently – maybe at the switch level.
In this configuration you can use the WiFi as an access point for your LAN as it’s attached to the LAN bridge.
If you want to use the VOIP in the TG799 while in bridge mode, you will need to configure a default gateway, a nameserver, and configure the pabx to use the LAN bridge as the outgoing interface. The following example uses Google for DNS and assumes your router is at 10.0.0.254:
1
2
3
4
5
uci set network.lan.dns='8.8.8.8'
uci set network.lan.gateway='10.0.0.254'
uci set mmpbxrvsipnet.sip_net.interface='lan'
uci set mmpbxrvsipnet.sip_net.interface6='lan6'
uci commit
You can check the current running dns with cat /etc/resolv.conf
Enable web interface features in Bridge Mode
If you have the modem in bridge mode, the web interface is gutted compared to in routed mode.
Edit /www/lua/cards_limiter.lua and change the following function to:
1
2
3
4
5
6
7
8
function M.card_limited(info, cardname)
 ## Display all cards.
 return false
 if info.bridged then
 return not bridge_limit_list[cardname]
 end
 return false
end
Restart the web interface via: /etc/init.d/nginx restart
Note that to get out of bridged mode you will still have to factory reset (and possibly do the whole rooting procedure again) or find and reverse the config changes that were made to flick it into bridge mode.
Configuring multiple third party SIP providers
If you have multiple SIP accounts to log into – and with different providers, you can duplicate the entire sip_net section under a different name (very important, it will break VOIP completely otherwise) and configure as per above, or using the web interface. The web interface will see the section in the config once you add it in. It would be possible to add the section using UCI but it’s quicker with an editor and you will get the most recent defaults from your existing profile rather than a stale web page!
SIP call routing
Each DECT device or FXS port can be registered against one or multiple SIP accounts. Look for the incoming_map section against sip_profile_0 and edit as needed. This should also be possible via the web interface after running the above default config which adds in a web page to allow editing this config. This is my setup to route sip_profile_1 to the first registered DECT device – and FXS port 1:
1
2
3
4
5
6
7
8
9
10
11
12
13
14
15
16
17
18
19
config incoming_map
 option profile 'sip_profile_0'
 list device 'fxs_dev_0'
 list device 'dect_dev_1'
 list device 'dect_dev_2'
 list device 'dect_dev_3'
 list device 'dect_dev_4'
 list device 'dect_dev_5'
 list device 'sip_dev_0'
 list device 'sip_dev_1'
 list device 'sip_dev_2'
 list device 'sip_dev_3'
 list device 'sip_dev_4'
 list device 'sip_dev_5'
 list device 'sip_dev_6'
config incoming_map
 option profile 'sip_profile_1'
 list device 'dect_dev_0'
 list device 'fxs_dev_1'
Registering DECT handsets
There is a button on the modem you can hold for five seconds, or after enabling all the ‘cards’ via the web interface, the easy way is to start DECT paring via the web interface. Click on the Telephony card, then ‘Start’ the paring and follow the instructions for your handset. This was straight forward for me.
LAN SIP client use of the mini-PABX in the modem
It is possible to make calls out through the modem by registering as a SIP client. Clients 1 to 7 are configured and can be used like so for 1:
1
2
3
Username: 1
Password: <see below for finding the passwords>
Authentication User: phone1@telstra.gateway
To get a list of all the passwords set run this in SSH (noting that sip_dev_0 maps to phone1 etc):
uci show |grep mmpbxrvsipdev.sip_dev_..password
Please don’t post the default passwords in public forums as they could be a security risk for those still using them!
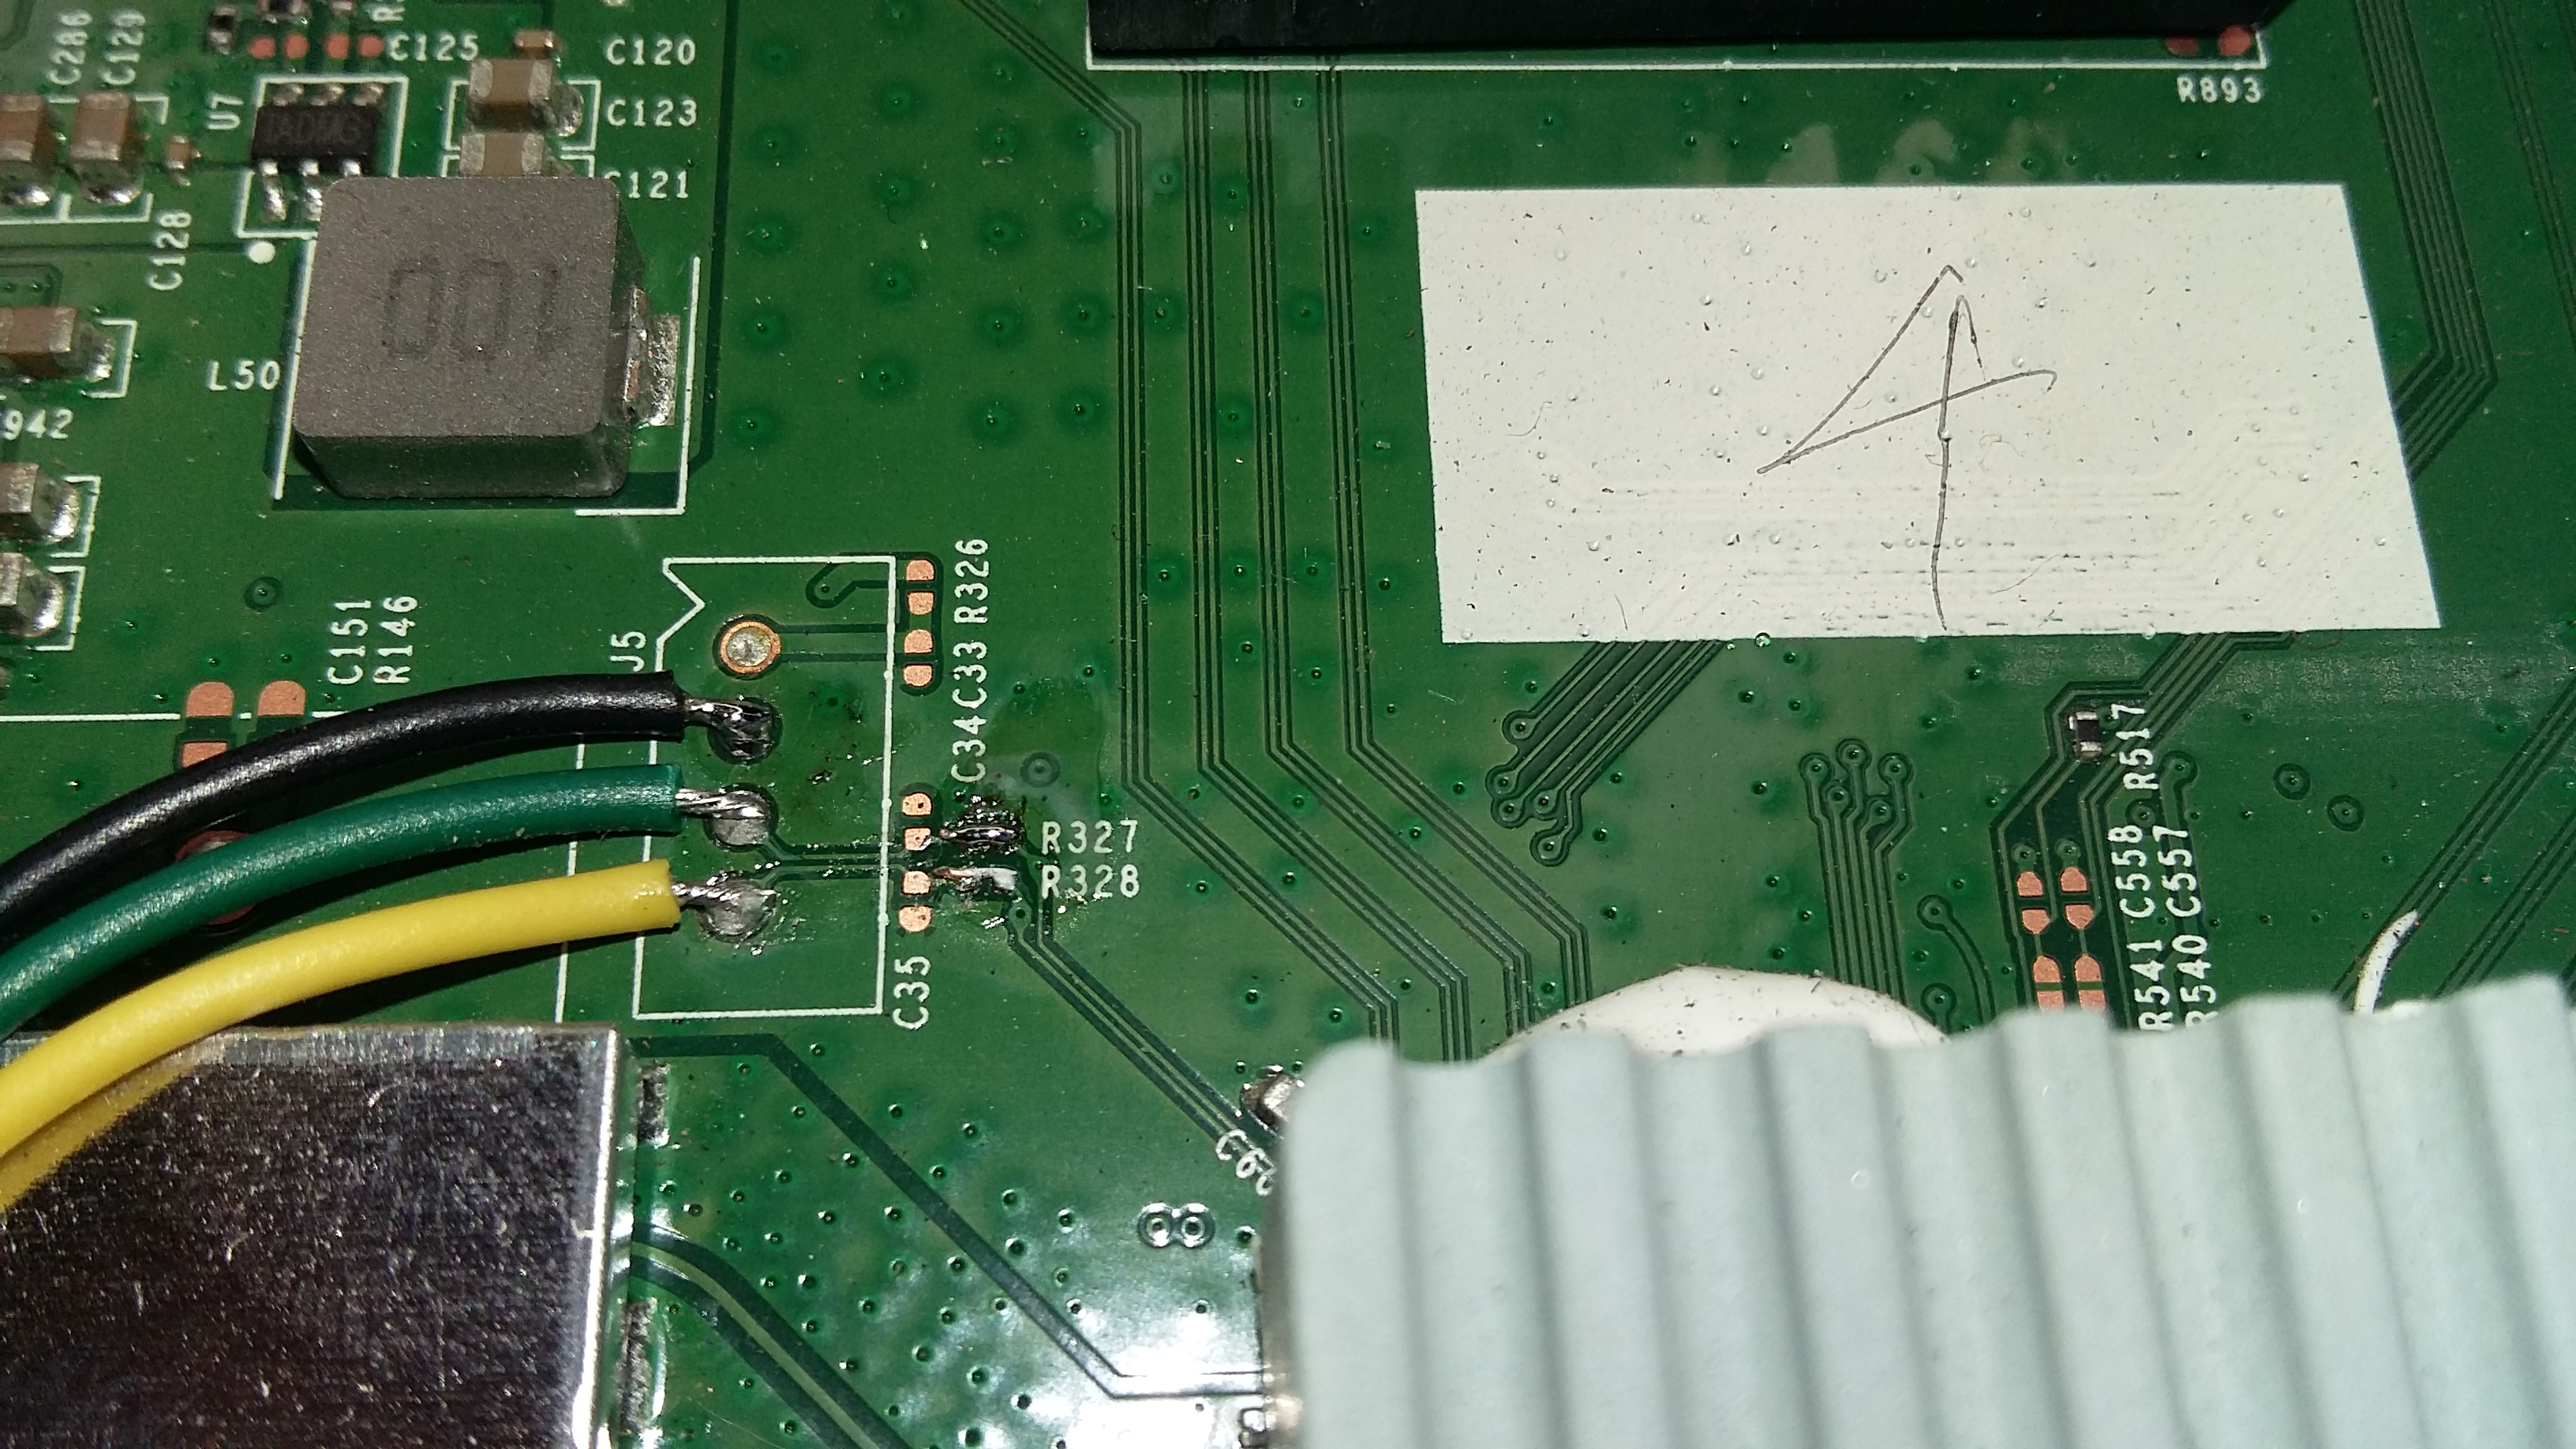
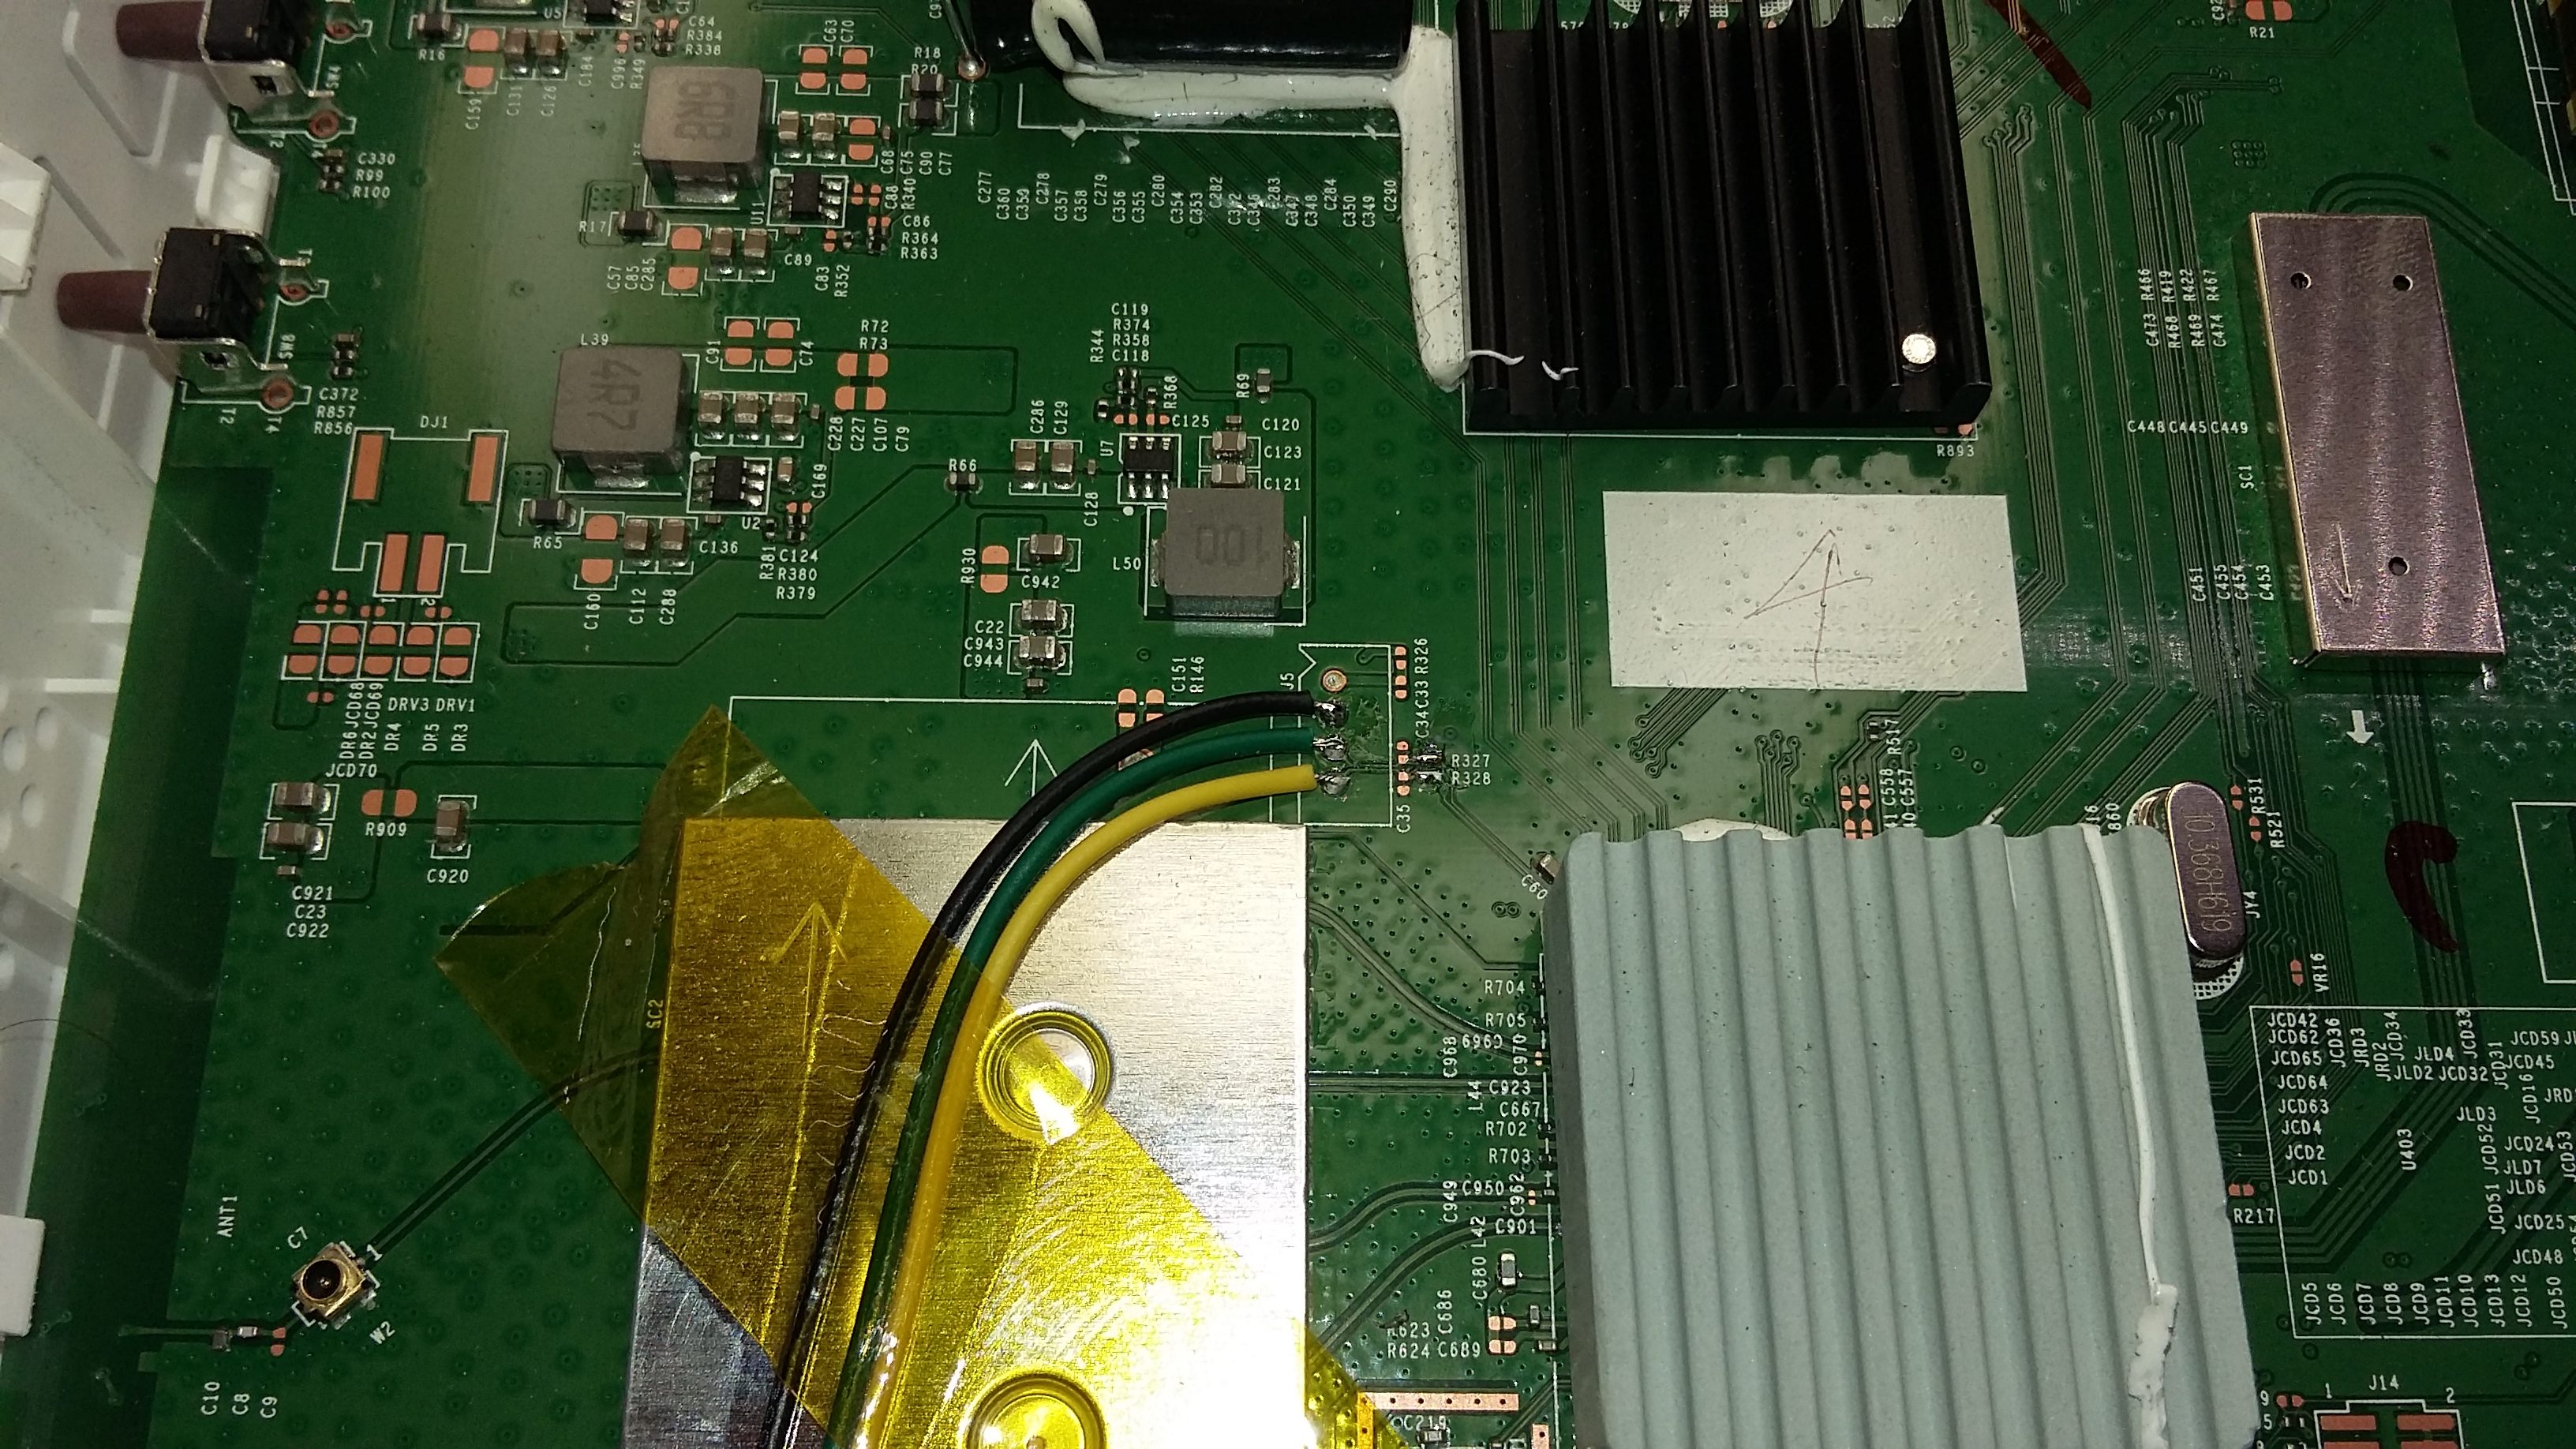
Serial Console
A serial console can be added using a 3.3v to RS232 adapter. These can be found on ebay quite cheaply. The serial console is J5 on the board, and note from the picture below, R327 and R328 need to be solder bridged to pass the serial signals to the adaptor. In the pictures shown, Black = Ground, Yellow = RX, and Green = TX.
Note that by default you can’t log in on the serial console. If you want to enable this, edit /etc/inittab and change
#ttyS0::askfirst:/bin/login
to
ttyS0::askfirst:/bin/login
NAT ALG helpers
With the above changes you should now have a tile in the advanced GUI what allows you to change the settings for NAT ALGs.
tcpdump is now in the diagnostics?
I was very happy to find this hidden gem. Sadly there is no icon for it so I had to reuse one. Read the memory usage warnings before using it! I tested it once and file it provided opened up OK in WireShark.
Handy info for checking what's running in your modem
Checking what firmware is flashed and what is active:
find /proc/banktable -type f -print -exec cat {} ';'
What processes are running? (you should not see cmwpd etc on this list!)
ps
What programs are listening as network services?
netstat -tuplen
How much free space is there left for config files?
df -h
Can I see the full config? (be prepared for ~7700 lines of text hitting your console)
uci show
Can I filter that output for say just things with the word password in them?
uci show | grep password
What's that System Extras tab and what can I do in there?
- You can turn on logging to an external syslog server. On windows run TFTPD64 (from http://tftpd32.jounin.net/tftpd32_download.html) and configure syslog in the settings. You can enable more logging in the VOIP subsystem by editing the logging config in /etc/config/mmpbx
- You can trigger a PXE firmware upgrade to bank_1. This is only for advanced users! If you click this by accident you will have to wait for it to time out and reboot, or power cycle it while the orange light is flashing.
- You can turn SSH access on/off from the LAN/WAN.
My firmware is so old that AutoFlashGUI can't authenticate to the modem!
This is because they changed the web authentication method to SRPv6 with firmware v15, and this is the only method that the AutoFlashGUI tool knows how to authenticate with. You are going to have to flash the v16.3 .rbi file via sysupgrade after using the original manual procedure to get a shell.
Visit the ‘Diagnostics’ page on the modem, and click on the Ping & Traceroute tab. (If your modem doesn’t display the Diagnostics tile, factory reset the modem. The observation is that this only happens when the config is corrupted somehow.) In the IP address section, enter and run:
:::::::;echo root:root | chpasswd; dropbear -p 6666;
Give it 30 seconds to generate SSH host keys and then try to connect to your modem with SSH on port 6666 with root/root.
Copy the .rbi to a USB stick (FAT32 formatted is most likely to work on old firmware) and insert it into the modem.
If you type cd /mnt/ and keep hitting tab it should eventually get to the end of the USB stick path, then hit enter. (You can also run ‘mount’ and try to work out the path the USB stick is mounted on, or ‘dmesg’ to check the system log to see if there was an error automatically mounting it.)
To be on the on the safe side we will copy the rbi to RAM, then flash it. Do the following with the correct .rbi name (keeping in mind that this is case sensitive):
1
2
3
cp filename.rbi /tmp
cd /tmp
sysupgrade filename.rbi
All things going well you should see it progress along and reboot, then you can commence the current procedure.
I want to factory reset 17.2 but I don't want to have to re-flash (aka Ghetto Reset!)
These modems use two roms (bank_1 and bank_2) which can be upgraded/used almost independently. They are digital-signature verified before boot so you can’t edit the rom image in the flash. The config is stored in the matching folder in /overlay i.e. /overlay/bank_2 (hint: you can see your modified config files in here if you want to back stuff up or see what changes you made). When a proper factory reset is done, the overlay partition is formatted (but not securely wiped).
To reset without doing an official reset, disconnect your WAN connection (cwmpd will become acitve again temporarily), go into SSH and do the following:
1
2
3
4
5
6
7
8
9
rm -rf /overlay/`cat /proc/banktable/active`
mkdir /overlay/`cat /proc/banktable/active`
chmod 755 /overlay/`cat /proc/banktable/active`
mkdir /overlay/`cat /proc/banktable/active`/etc
chmod 775 /overlay/`cat /proc/banktable/active`/etc
echo "echo root:root | chpasswd" > /overlay/`cat /proc/banktable/active`/etc/rc.local
echo "dropbear -p 6666 &" >> /overlay/`cat /proc/banktable/active`/etc/rc.local
chmod +x /overlay/`cat /proc/banktable/active`/etc/rc.local
sync
Wait 5 seconds and turn the modem’s power off. Ensure the WAN is disconnected!
Turn it back on and then resume the original procedure at “Setting up firmware v17.2”.
I'm selling this modem, how do I securely wipe all the config?
Disconnect the WAN. Log in via SSH and run:
1
rm -rf /overlay/*;dd if=/dev/urandom of=/overlay/garbage bs=512;sync;rm /overlay/garbage;sync;
Wait until it has completed and turn the modem’s power off.
Note that after this cwmpd will be active again so you could get upgraded against your will if it once it is connected to the internet again!